The new Augments for Equinox and Atlas came out recently (18.4.7) so I immediately jumped at the Atlas mods... and got disappointed. 2 of the three were lackluster and I didn't have the heart to try the third so... I went and got the Equinox augments. I was not disappointed.
After fiddling around with Equinox, I found that I had to apply one more Forma so naturally, the first augment I was able to sue was Duality.
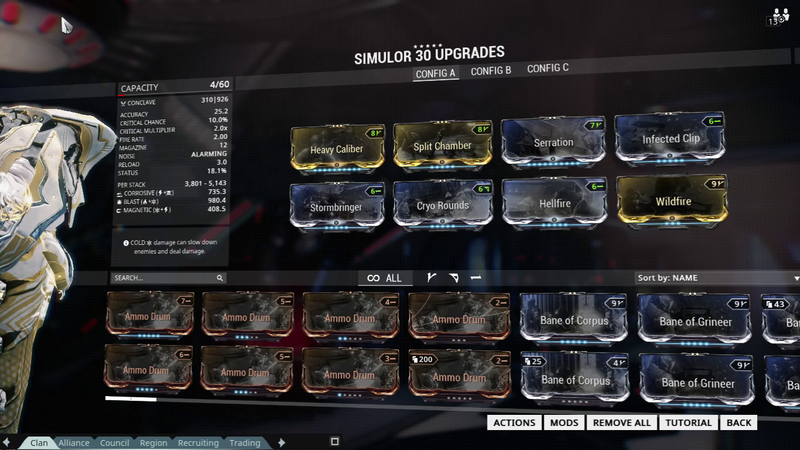
I used Continuity and a Maxed Duality mod At rank 1 and Hosted a T3 Def getting the usual suspects in (Frost, Excalibur and EV Trinity) to level up and hopefully get an Ash prime BP (for the 100 plat it's worth as of this writing err... typing). It was fun playing around with the specter and the Synoid Simulor I had on. I would cover one side , trigger it and rush to the other side and it would just spam the hell out of the primary. I would Jump up the bridge just in front of the pod, trigger Metamorphosis and jump down on an unsuspecting Mob of corrupted just as my Specter materializes doubling the Simulor spam.
Needless to say I enjoyed my way to 25.
Below is my current Duality Build for Equinox.
The Build just focuses on Duration and Efficiency so I can get a specter out as often as I want. I want to add one more polarity but I can't decide which polarity at the moment.
So at that time I was rank 25 and was thinking if I should go and run another T3 Def, then I checked the augments and found Calm and Frenzy. I grinned because I knew where exactly to apply it's unique properties (specifically Night).
I often use Loki to farm Focus (especially with the Orthos Prime build I have here). I've really been wanting to replace him because he was so... hmm... well I was just sick of Loki, but my potential replacement, Ivara, was a dud (too slow). So now that I can spam Rest and Put whole maps to sleep (for a little over 40 seconds at a time)... I naturally go to Vedic, Ceres.
The Rank 25 build I used there was Focused on range primarily (Overextended, Stretch and Cunning Drift) then Duration.
I was initially conservative with my Rest casts, but when I enemies started spotting me, I just spammed it and it worked fine. With whole maps put to sleep I just spun and won with Orthos Prime til I hit 30.
It was crazy fun stealth if not a tad overpowered (at least for that map). Since bumping into enemies did not break the effects of Rest, I had no hesitations taking advantage of Maiming Strike.
My current Rest Build is below.
It continues to prioritize Range, followed closely by Duration. Enemy sense is there to boost my Carrier's Animal Instinct so my spamming has direction.
So now My equinox is back to rank 30. Unlike with Atlas, I wanted more so I definitely wanted to play with Peaceful Provocation.
My initial issue with Equinox as a buffer is that he maxes out at 50%. With the new augment, the Power Strength jumps to a maximum of 80%! So I cobbled together my old buff build and added the augment. The build is below:
This Build Buffs up to 77~%. The great thing is that it has great synergy with a lot of frames since it doesn't just boost damage. For example your mediocre EV Trin suddenly becomes an unlimited source of power, Frost Globes instantly become more durable along with Iron Skin. If you add Roar to the mix, well... the possibilities are endless.
On top of this, you can still activate your Ultimate... which also benefits from your newly improved Provoke. All while still gaining energy from EV. Just perfect!
Of course I do the expected and run a CP team in T3 Defense to play with the combo. As expected it went quickly and smoothly. I even out damaged our RJ Excal when he went spamming EB.
Give the new Augments a spin and share your build down in the comments!
Thanks for reading.
Showing posts with label Builds. Show all posts
Monday, February 8, 2016
Monday, February 1, 2016
Orthos Prime: Maiming Strike Build (Shadow Debt Mod Set)
We all love the Orthos Prime for it's insane range, One of it's biggest drawbacks is the damage. This caused players to look elsewhere to get their fix of stealth slide kills... until the new mods came out.
Shadow Debt was a unique event that gave the chance to drop one of the new mods that was added in Update 18.4.1. Most of these new mods were odd, but there were a hand full of gems, including a lot of great melee mods.
This build uses some of these new mods to boost it's damage output per slide attack. Blood Rush and Body Count give a boost to the damage multiplier and Critical chance. Maiming Strike will drive this up by 90% guaranteeing yellow crits per slide attack with a chance to do red crits.
The Build
This particular build is focused on Grineer and per slide damage (stealth kills/one hit). This is the reason why I did away with the Attack speed mods like Berserker. I also opted to remove True Steel and instead add Spoiled Strike, which will add more damage compared a small increase to the critical chance.
Since you are making use of 2 slots for elements, you can easily change the elemental combo. the only restriction is that you can only have 1 elemental combo.
Executing High Damage Slide attacks
Once you're done with the build, you can start by just slide attacking everything. With the immense reach of Orthos Prime with Primed Reach, you can safely clear clusters of enemies while maintaining the damage multiplier from stealth.
Be careful with heavy units. you might want to channel to kill them safely and avoid breaking your stealth bonus streak. Once you have a high enough multiplier you can just slide attack them as normal.
I usually use this to farm focus with Loki. in Ceres (Extermination or Sabotage). After a few days of farming, I can say it's easier than using War or Tonkor and breaks the stealth bonus streak less frequently.
Shadow Debt: The Rise of Naramon
Naramon's Shadow step has never been in such a wonderful position. Prior to this update, Naramon had very tempting options related to melee attack crits and invisibility. Now, with a reliable source of crits (maiming strike and any melee weapon with at least a 10% Critical chance will proc crits 100% of the time), you will just need enemies and you will get 10 seconds of invisibility that is resistant to nullifiers.
Luckily, Orthos Prime is such a weapon with a 10% Crit rate. Now slide attacks with amazing range now comes with a 100% Crit chance.
Monday, January 11, 2016
[Builds] Rhino: Basic and Extreme Builds as of 18.2.4
Rhino is a very versatile frame that has a damage, survivability and control. Here are three builds that will help you start out with this powerful frame.
The Basic Build
This build is all about efficiency and flexibility. With this build you can deal damage, you can control and even buff all at max Efficiency.
Extreme Damage
Rhino can definitely deal damage, but it's not going to come from stomp, but Iron Shrapnel. Maximum potential damage is 13894.276 after using Roar. You'll have to consider that this damage will decrease with range (~25m according to wiki). This could also potentially increase because of the damage absorption phase or Iron Skin. Rhino Charge will be your next go to skill in terms of damage especially with the new combo mechanic. You will probably just use stomp for the CC and do this rarely.
The biggest problem with extreme builds like this is the energy consumption. You'll want to use this only with an EV Trin in your team. Given that EVs are rare you might find yourself using the basic build most of the time.
Roar Only
This build, as the header states is focused on Roar as a means to boost your team's damage. a 2.49 damage multiplier is nothing to laugh at especially considering the damage that can be achieved with Warframes like Ash (Blade Storm). This build also has decent Iron Skin health along with good Rhino Charge damage.
As with the build above, you can expect problems with energy so EV Trinity is a must.
Monday, October 5, 2015
[Guide] Understanding the Efficiency and Duration Change for Toggle Abilities post 17.5
With the advent of 17.5 came the changes to how duration affects abilities that can be toggled on and off. It mostly affects Ultimates like Excalibur's Exalted Blade and some non-Ultimate abilities like Spectral Scream.
The Gist
Keep Duration at about 100% and Add 175% Power Efficiency.
The Details
This effectively (but indirectly) nerfs Transient Fortitude and Fleeting Expertise for toggle abilities. Prior to this change duration was not necessary for these abilities, but now, duration mods will become mandatory if you use either of the mods above.
The Formula
(Base Drain*(1-Total Efficiency [total mod values]))/Total Duration [stat value or total mod
value+100%]
Your Duration should be at 400% [total mod value+100%] before you can remove efficiency mods completely and achieve the minimum energy per second drain.
I created a table for those who want to play around the values. You can find it here.
The sheet is pretty straightforward. Just plug in the values from the mods you are thinking of equipping and you will see the final energy drain. Don't forget to plug in the base energy drain from the skill, it's defaulted to Exalted Blade since it's what I used to determine the formula.
Feel free to copy it to excel. Please give me credit (link this post) if you are going to share the formula.
Thanks!
Feel free to copy it to excel. Please give me credit (link this post) if you are going to share the formula.
Thanks!
Sunday, June 28, 2015
[Weapon: Primary] Simulor Review and Build 16.10.1
Background:
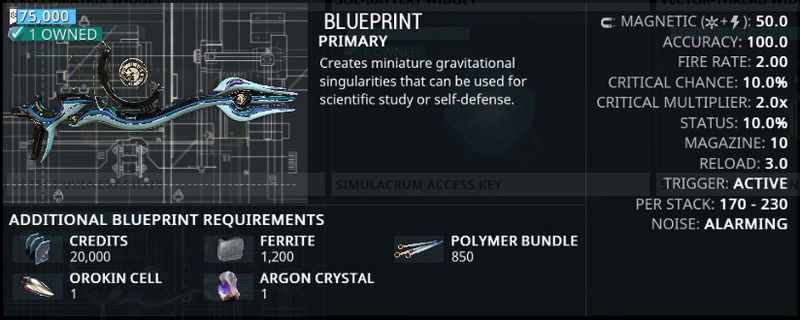
Simulor was released in 16.10.0.
Acquisition:
The weapon
can be obtained from Simaris for 75,000 standing. Just go to his sanctuary in
any relay (it takes 12 hours to build).
You can also
purchase the weapon for 210 plat.
Polarities:
It has a
built in “D” and “-“ polarities which is nifty given that it’s a low status
weapon. This means it’ll take less forma to max.
Primary Fire:
The primary
fire function sends circular a projectile towards the target. If it hits
anything, it’ll bounce off and deal no damage. It doesn’t destroy containers or
any items that usually be destroyed by gunfire. Projectiles are not subject to
gravity and will float in place after the initial 12m flight. Projectiles will
disappear after 8 seconds.
Whenever 2
projectiles collide, these merge dealing an AOE burst around it. The more
projectiles merge the stronger the damage, stacking up to 5. Once two projectiles
merge, it generates a small field that makes other projectiles drift closer to
it. The more projectiles merge the bigger and stronger the attraction will be
to the other projectiles. Each time it merges with another projectile, the 8
second lifespan of the projectile is renewed. Once it elapses, the projectile
is detonated.
Once 5
projectiles have merged a small vortex will be produced. This blocks weapons
fire hitting the center, deals AOE damage and causes status procs. Any further
projectiles merged with the vortex will refresh it’s 8 sec duration. Similar to
merged projectiles mentioned above, the vortex will detonate if left for 8
seconds dealing AOE damage to all enemies close by.
Secondary Fire:
The RMB
triggers the detonation of the projectile, merged or unmerged. The damage increases
with each merged projectile capping at 5. The damage per stack is listed in the
arsenal.
Mods:
All mods
work with the weapon except the following:
- Firestorm
- Terminal Velocity
- Sinister Reach
Notes:
Jetstream
(Turbulence augment), increasing flight speed, increases the speed and range of
the Simulor projectiles. Using it is ill advised at high power strength because
the projectiles deal no damage upon impact. If Terminal Velocity does get
applied to this mod, test the percentages before using it in battle since
faster projectiles tend to become less predictable.
Verdict:
It's a nice specialty gun that's fun. The fact that projectiles deal no damage suites it more for area control than anything. A running battle will find the weapon lacking since the usual suspects, Boltor and Soma are well suited for this.The weapon might find use in Void defenses (T3 and up) where Nulliflers pop up since it can easily kill them even with the bubble on, once they get in range.
This won't replace Tonkor as your favorite launcher, but if you have the space, it might be a fun gun to carry.
Unranked Gameplay Video:
Thursday, June 18, 2015
[Build] Excalibur Revisited: Frame and Weapon Build (as of 16.9.1)
UPDATE:
Visit here for a more updated build based on 16.9.3:
http://warframechronicles.blogspot.com/2015/06/update-exalted-blade-changes-1693.html
the gameplay video can be seen here:
http://warframechronicles.blogspot.com/2015/06/gameplay-video-excalibur-revisited-1693.html
Visit here for a finisher build that does more than one mil damage based on 16.9.4:
http://warframechronicles.blogspot.com/2015/06/build-excalibur-max-damage-finisher.html
The new changes to Excalibur just went live. Feedback is being gathered in the forum and so far, it’s been fun!
The official
change log can be viewed here:
Here’s the
bit about the rework:
Excalibur Rework
No matter your play style, Excalibur is always a formidable Warframe choice. With newly re-worked Abilities, he is now more versatile than ever.
The following changes have been made to Excalibur’s Abilities. Please note that we will continue to monitor these changes after launch to make any necessary tweaks to balance.
First Ability: Slash Dash: Slash Dash will now target enemies within a conal distance from Excalibur, targeting all enemies within the range of cast. Enemies hit by Slash Dash will count towards the player’s melee combo counter.
Second Ability: Radial Blind: Cast on the move and opens AI to finishers.
Third Ability: Super Jump has been removed from Excalibur’s Abilities.
Third Ability: Radial Javelin is now Excalibur’s third Ability and costs 75 Energy to activate.
Fourth Ability: New Ability: Exalted Blade: Excalibur summons a sword of pure light and immense power.
Stat changes: Excalibur Armor: Excalibur’s base has been increased to 225 and to 250 for Excalibur Prime.
Excalibur’s Abilities have all been given a visual overhaul in line with his new Exalted Blade ability.
I personally
enjoy the new Slash Dash and Exalted Blade.
Here’s the
Excalibur Build:
This build
focuses on the damage of Exalted Blade energy waves. With this build and the
Arcane Pendragon helm, you can deal 1321 damage per wave to level 38 Volatile
Runners (tested in Seimeni, Ceres). Your melee slashes will still deal a lot more damage so don't be afraid to use Slash Dash to finish tough enemies or to get close enough to whack them with the energy blade.
The basic
game plan is to fill up with energy using Rage and Winds of Purity (Furis),
then turn Exalted Blade and never turn it off. It’s a fun build that showcases
the changes to Excalibur.
Synergies:
Rage, Winds of Purity (Furis), Flow (Primed or not), Steel Fiber and Vitality
Survivability:
I took
advantage of the armor buff and placed Steel Fiber and Vitality. This gives the
frame a larger health pool and armor to survive with.
Damage:
The increase
comes from as many efficient sources as I got my hands on. That means Transient
Fortitude and Intensify. Blind Rage was too costly in terms of efficiency so I passed
on it. Another good mod to increase damage is Steel Charge which increases melee damage, including the damage of Exalted Blade slashes and energy waves.
Efficiency:
I after
testing max efficiency, I went with maxed Fleeting Expertise. Duration didn’t wasn’t
a problem and 60% efficiency was more than enough to always have Exalted Blade
on after filling your energy with rage and Furis (Winds of Purity) especially
with the already low drain on energy that Exalted Blade has (3 per second base)
Range:
Stretch was
replaced Streamline to make Slash Dash more viable in the build. I might
replace it with something else.
Duration:
Duration was
not moded for in this build.
Here’s the Melee
weapon build (Skana/Prime):
UPDATE:
Visit here for a more updated build based on 16.9.3:
http://warframechronicles.blogspot.com/2015/06/update-exalted-blade-changes-1693.html
Damage:
This weapon
was not meant to be used outside of Exalted Blade. I placed Pressure Point,
Spoiled Strike and Bright Purity for Damage since these are the only mods that
affect the damage of the energy wave at this point.
Attack Speed:
Fury and Berserker
help with the speed allowing the frame to create more energy waves. Berserker only
has a chance to proc if your energy sword hits an enemy (not the wave). Easy
enemies will not even get close, but if they do manage to, the Berserker proc
will allow you to push enemies back with a barrage of energy waves!
Utility:
Reflex Coil,
Focus Energy and Life Strike provide a source of survivability without having
to cease Exalted Blade. The good thing about it is it only counts as a channel
hit if your energy sword (not the wave) hits the enemy. So you can just Slash
Dash if you need health and keep channeling on with Exalted Blade without
having to worry about losing energy too fast.
Alternatives:
Other weapons that may work are any melee weapons with a syndicate mod that adds +100% melee damage. If you don't have one, a regular Skana should be okay.
Enjoy the build!
Sunday, May 31, 2015
[Farming] Draco: Basics and Beyond
There are several reasons why people go to Draco. No matter
the reason people want to get it done and over with as few complications as
possible. Here’s the most common team comp for running 4 waves of Draco the
easy way to help you make team comp decisions when hosting or to help you build
your frame so you can join Draco teams that are recruiting.
The Team Composition
Minimum Requirements
Mag with Greedy Pull
Frost
Mesa
This is your holy trinity of area control. This combination
works for any mission that requires area control (like defense). Just make sure
that the frames are at max or near-max rank. Lower frame levels might create
problems especially because the rank of frame powers are tied to the rank of
the frame.
The last frame can be anything but will most likely be a
rank 0 frame (or close to it) that needs affinity for rank ups. Just need to
make sure the frame has enough Health and shields to survive a couple of hits
in case problems occur.
Recommended Team
Composition
Mag with Greedy Pull
Frost
Mesa
Nekros
Nekros will help with health and energy drops while also
increasing the drop rate of everything. This makes Draco a core farm on top of
the affinity that you gain from running the mission. Since The enemy levels in
rounds 1-4 can easily be handled by Mesa’s Peacemaker, there’s no need to get a
Total Eclipse Mirage or Roar Rhino.
Frame
Specifics
MAG
Ever since greedy pull was released Mag has been relegated
to be a glorified carrier. So this is her niche now.
The Mag you pick has to be at least rank 18, to get Pull
rank 3, with a range of at least 200%. This gives Mag a 50m pull. This will
allow Mag to get loot within Mesa’s Peacemaker’s 50m range.
If you want a better experience, get a mag with max range
and efficiency. At max range Mag’s pull range jumps to 65 m (with arcane coil).
This is amazing because aside from pulling just loot, Mag will now be able to
pull enemies into Mesa’s 50m range. Max efficiency will help with the spam. The
killing will be faster, hence the spawning will be faster. Your team will get
more loot because of the faster kill rate and with a Nekros in the team, your
team will get even more.
A really good Mag will also use Shield polarize to help in
sticky situations. The Shield Transference mod even makes the team get
overshields with each cast. This would probably be overkill in Draco though. I
have power at 95% which is decent (enough to provide shields to my team in a
wide area) given that you have max Overextend installed.
Here’s the Mag Build I use for Draco:
Frost
Frost has always been an area control frame despite the nerfs
to Snow Globe he still does a good job.
The mag you pick has to be rank 28, to get snow globe rank
3, with at least 100% range and 100% power strength. This will help you keep
the globe around your team to make sure that Mesa doesn’t stops shooting.
If you want a better experience, get a frost with higher
power strength and duration percentages. This minimizes the chance that your
team wipes out.
A really good Frost will buff Mesa with Freeze Force (Freeze
Augment) increasing the damage of Peacemaker significantly. Again, faster kills
mean more enemy spawns hence more affinity and loot for everyone.
Here’s the Frost build I use for Draco:
Mesa
Mesa is an area control frame that specializes in damage.
She makes everything faster because of her ultimate, Peacemaker, which
basically turns her into a turret. Mesa makes Draco easy. Fi Mesa stops
shooting, it could lead to your team being overwhelmed and eventually wiped.
The Mesa you pick has to be at rank 30 so she can kill at a
decent rate. Max efficiency is also needed so Mesa can keep Peacemaker up from
the start of the wave until the end.
If you want a better experience, higher power strength with
a power percentages will make the run smoother. The high energy pool will allow
her to continue even if Mag has to go away to either cap or revive.
A really good Mesa will also have high duration to cast and
keep Shatter Shield up in case something happens to the globe and/or frost.
Here’s the Mesa build I use for Draco:
Nekros
Nekros is your support frame. He’ll make the run smoother as
his Desecrate ability creates energy and health orbs for your team. He’ll also
help you get more loot.
The Nekros you need to pick must have max range (58.75m) so
he can Desecrate all the enemies killed by Mesa with room to move around. This
will also leave energy for Terrify in case there are enemies in the room below
the boxes and aren’t moving, or if your team is in a bind.
If you want a better experience, Despoil is Desecrate
Augment that will allow Nekros to use Health instead of energy. At Max
efficiency, with the amount of enemies and Mag pulling, you will never run out
of Health, hence, never stop Desecrating.
A really good Nekros will also have Soul Survivor, a Soul
Punch Augment that will allow you to revive an ally immediately with the use of
Soul Punch. Although this uses all your energy, the Despoil augment will allow
you to start Desecrating immediately. This will allow the team to get back into
action faster.
Here’s the Nekros build I use for Draco:
Roles
At the Beginning of
the Game/Setting Up/Wave 1
Frost stands on the two boxes/crates near the elevator when
the team emerges from and casts Snow Globe. Mesa Stands there and Starts
Peacemaker clearing the initial set of enemies, then stops. There won’t be more
enemies until one of the points are captured. Nekros desecrates the dead. Mag
pulls the loot to Mesa to help give her a starting energy pool.
After Frost casts globe, He starts capturing points D and C.
Nekros can help capture while desecrating.
As soon as a point is captured, Mesa initi8ates Peacemaker
and keeps it up until the round is done. Nekross and Mag have to start Pulling
and Desecrating at this time. During this time Frost makes sure to keep globe
up around the three and finish capturing points C and D and start neutralizing point
A, until the team has a 1-3% lead. The percentage doesn’t matter as the rate of
increase will be the same. The bigger the lead though, the better the guarantee
that you will win, despite complications.
The rest of the wave
will basically be spamming. Mesa stays in Peacemaker mode, Mag spams Pull,
Nekros spams Desecrate and Frost Spams globe. When you reach 100%, just let
Mesa take care of the enemies and have frost go after whatever is left hiding
beyond Peacemaker’s range.
The Next Three Waves
This is going to be similar to their first wave, but easier.
At this time, your Mesa will have a bigger pool of energy to work with and the
rest of the team can just focus on capping D and C and starting that 1-3% lead
by neutralizing A.
Extract after wave 4 to get the T4 key and repeat if you
want more keys or need more affinity.
No Nekros
Well, it’s going to be very similar but your team may have
to drop several energy/health restores. Discuss this with the 4th
(who was supposed to be Nekros) so that player can cover the energy/health
restores for the run.
Things to Keep
in Mind
Mesa Must NEVER STOP
Peacemaker
Mesa keeps enemies from increasing in number and overwhelming
the party. She doesn’t cap unless it’s the start of the round and even then,
must be ready to initiate Peacemaker right after. If things happen let the
other three take care of it. If she stops shooting, other frames will have to
start doing damage instead of doing their roles. If Mesa goes down, drop an
energy restore and have Mag spam Crush while someone revives. If Nekros has
Soul Survivor, just let him revive Mesa.
Mesa will not get Affinity
for Her Weapons
Mag, Frost and Nekross will all get affinity for their
weapons since they’re benefitting from the radial affinity from Mesa’s Kills.
Mesa however will not get affinity, since all her affinity goes into her (the
frame) and not her weapons. The last time I tried this, the only weapon I equipped
went from rank 0 to rank 5 after 4 slow rounds. In comparison, A weapon is
usually maxed out after 2 slow rounds and a fast round.
You Can Fast Forward
Draco Runs
Depending on what your team needs, affinity/loot vs just the
key. Your team may decide to cap 2 points (slow) to 4 points (very fast).
Communicate with your
Team and be Honest
Tell your team what you need or have while creating a squad.
Tell them what needs to be done if they are doing it wrong. Point them to a
guide if you think it’ll help. Tell them if you need a fast run or a slow run.
It’s better to spend a few minutes communicating than waste 20-30 minutes on a
failed run or have someone quit in the middle of the run because someone wants
it done fast when they need slow runs.
Maxing Weapons
If you want to max out a weapon in 1 run (2 slow 2 fast),
offer to join as either a Mag, Frost or Nekross and just equip the weapon you
need to rank up. You can press “p” to view the mission progress window and
check what rank your weapon is.
If you want to rank up more than one weapon, expect it go
slower. Affinity is distributed equally to each weapon you have equipped,
regardless if it’s maxed or not.
Final
Remark
Thanks for reading. Hope you learned something to make those
Draco runs better!
Subscribe to:
Posts (Atom)